Feeds:
Posts
Comments

For really, really large jobs – like this park project in Los Angeles, we send out (imagine UFC announcer Bruce Buffer’s voice here)…thhhhhhhhhaaa TRANSPLANTER!!!

It’s not perfect, but it will save some poor fellows’ back from installing 280 trays of California Buffalograss. That’s 35,840 plugs which would otherwise be installed one by one by one by one by one…until the end of time!

California Buffalograss trays waiting for their chance in the sunlight:

The transplanter reduces it down to a two man job…one to pull the transplanter along and one to do the planting:

Thanks to our Socal rep Tom Hawkins at Florasource for the pics!

We’ve had some bewildered established California Buffalograss lawn owners contact us this season wondering what the heck is going on with their lawns! If your lawn too was once green and is now looking like it’s dying out, inadequate sprinkler coverage might be the culprit!

This Thousand Oaks, California resident sent us a picture of his lawn. It had been recently fertilized and he was watering it 3 times a week to try to get it to green up again. At first he thought it might have been burned by the fertilizer – but since half of the lanw appears to be green that didn’t appear to be the case. If it was a fertilizer burn the entire lawn would have been affected.

Immediately our thoughts were that the lawn was suffering from a lack of water, although the home-owner insisted that he was turning on his sprinklers 3 times a week. He further looked into his system and discovered that there was inadequate water pressure and some areas of the lawn were not get  reached.

Use a small hand shovel and check the ground to see if your problem areas are getting enough coverage. Your California Buffalograss lawn may not be getting any water at all in some spots due to low water pressure which can be caused from a broken sprinkler head or because the water is also being used in another area of the home or yard at the same time or due to blockage in the sprinkler heads from sand and minerals in the water supply, or your buffalograss or nearby plantings may also be getting too tall and might be partially or fully blocking the sprinklers.

If you have questions about your California Buffalograss lawn – don’t hesistate to contact us! 🙂

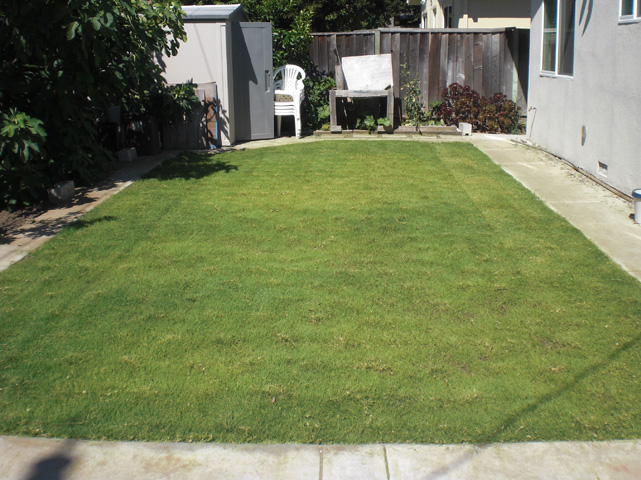
Contest-Winner-Corey has been keeping us thoroughly updated on the progress of his lawn! Read on below if you’re interested in seeing his detailed account – you might be able to apply some of it to your California Buffalograss lawn…or if you’d rather just look at his pretty progress pictures you can view it all on this little nifty web page he’s set up!

“Today marks 12 weeks in and the second mow…Not a lot different between 8 weeks and 12 weeks.  The biggest difference would be the bare spots where I spread steer manure or potting soil have either filled in nicely, or seem to be well on the way.  Of the two, I would say the steer manure worked better than the potting soil, probably because it had a finer texture (easier for runners to grab ahold of?) and maybe it held moisture better and probably also richer growing environment.  One of those regions I focused on in the “Other” picture column for week 8 and 12.

Regarding the coloration and growth pattern question I had last time at 8 weeks, I have not had a chance to test how evenly the sprinklers distribute water yet.  But, I bet that is more likely the case than soil quality.  I only have 2 inch pop-up sprinklers, and with the daily watering, the grass was growing quite well that I suspect it started to block the water spray near the sprinklers so more water would fall closer to the sprinklers, and the situation would only magnify as the grass got ever more taller.  Mowing probably helped a lot initially.  Now to toy with cutting back on watering frequency to try to slow down the growth a bit, and encourage deeper root system.  I had been watering daily at 5 minutes a shot, but now to try every 4 days at 10 minutes a shot.

I figured out the other weed that I was asking about in week 4 is probably some kind of spurge (the other you identified as purslane).  Now with the established grass, purslane is pretty much choked out (and the stragglers that do pop up are easy to pull out).  But, I can pretty much tell that spurge is probably going to be a forever battle.  It is definitely the most abundant weed in the grass, and the only one so far that easily co-habitates with the grass.  There is a picture in the 12 week pre-mow “Other” section.  The way it spreads out from the center, and the denseness of the grass, make it basically impossible to work down to the base to pull out at the root.  More often than not, I just end up breaking off stems.  Where before I was reluctant to use chemical means to control the weeds during establishment of the plugs (went with hand weeding only), now I think I may consider it.  Either just spray down the entire lawn with the Ortho Weed B Gone product that you recommended before, or maybe try spot treatment with the ready mix product first.  From what I read about spurge on the ol’ internet, it is a tough weed to knock out.  As Chris Berman would say on ESPN, there is no way to stop it, you can only hope to contain it.

Another interesting thing I have noticed is that there have been small “eruptions” of my old grass (some dwarf fescue) poking out here and there.  I thought it was pretty much all dead and wiped out from the 2+ years of neglect, and mostly pulled out before I planted the plugs, but some hardy survivors have been making appearances.  Very obvious to tell from the thicker blades.  Just been trying to pull them out.

Well, that is more than enough.  Thanks for your continued support on this project!”

– And thanks for keeping us all in the loop Corey! 🙂

Neighborly Love

Remember my parents’ neighbors whose newly installed California Buffalograss lawn I snapped pics of a few months ago?… Well, here’s how their grass is looking now!

The Lawn Reform Coalition

The Lawn Reform Coalition recommends California Buffalograss in a recent article stating, “The California Buffalograss variety was developed specifically for California and does very well there.” They also list other lawn options to help you conserve water. If you’re thinking about replacing your lawn go and check it out!

Un-mowed California Buffalograss lawn pictured below!

UC%20Verde%20meadow copy

We’ve had a couple of people contact us regarding a bit of patchiness in their new established lawns and it’s not exactly the hottest look in lawn trends right now! If your established lawn is also sporting bare spots, read on for what to do!

  • First you might need to increase the water to let the bare areas fill in more.  The runners may be going semi-dormant due to dryness. Sometimes this may mean hand watering certain areas because you may not be getting even sprinkler coverage. You should keep the soil moist till you are 100% covered then slowly start decreasing the water. Adding steer manure or humus to the area will also help the soil to retain moisture.
  • Second you can go ahead and mow to help simulate the runners and it would also be good to give them some fertilizer to get them growing more actively.

Those few things will get the grass to fill in and not look so patchy. We’ve notice that people sometimes start holding water back before the grass has had time to fill in. When they do that it stresses the runners before they have a chance to root in and establish themselves. You’ll usually see straw color grass blades on the bottom of the runners. Make these changes and it shouldn’t take more than a few weeks to for the bare patches to begin to fill in!

Y’all remember our contest winner Corey?! Well, he’s hit the 8 week mark and sent us a recent update of his California Buffalograss lawn!

His 8 week pre-mow status:

And post mow:

Wanna see more pics? Check out his website to see his lawn’s complete progress!

Here’s what Corey had to say:

“Eight weeks in and I have to say “Wow!”  Finally hit a consistent spell of hot sunny weather at the beginning of July and the grass really took off.  We went out of town for a week at the beginning of July and came back to find massive spreading of the grass throughout.  I was able to setup a better sprinkler timer before we left so was able to water 3 times a day, which probably also helped a lot (I reduced to twice a day a week or so ago because I think I was over watering a bit.  Will adjust depending on hotness of the weather…).  There were some spots that were not filling in as quickly/nicely so I spread some old steer manure or potting soil that I had onto those areas.  Maybe I can trick the grass to root into the manure/potting soil to fill in those spots.

At the 4 week mark, I was commenting to you about the weeding task, and looking for an easy way out via a spray.  I am glad I held off on trying any chemical methods.  Seeing how this grass explodes, one can really, really see how it can choke the weeds out.  Impressive.  Still need to get in there and do weeding, but it is much reduced now.  It is actually a little tougher to get to the base of weeds now to do a good job of pulling out roots because the grass fills in so densely.  So be it!  The mowing should help so will see.

Now another question if I may…  If you please look at the “8 Wks pre-mow Front” picture, perhaps you can make out that there are lusher, greener portions to the lawn, and yellower portions to the grass.  This is more obvious towards the rear half of the lawn where there is a yellowish central area while the perimeters are really lush and green.  The grass must be telling me something, but what?  Too much water?  Not enough?  Need more/less fertilizer?  Something else?  I am not too worried because the grass seems to be growing nicely, and I will probably be taking a wait and see approach (especially after this first mow), but still curious what might be going on.”

And you’re probably curious as to our response: “Looking at the premow looks like it might be your irrigation pattern since it’s so symetrical. Can you see how much moisture the center area has compared to the outer circle? If they’re same then probably a fertilizer feed in the center areas. Those are the only two things I can think of that is causing the coloration difference.”

Check out these pics Gary shot of an established California Buffalograss lawn in SoCal! Whether manicured or natural, California Buffalograss works with all garden styles! And may I say – I do like the drought tolerant landscaping in the background!

Gary wrote, “This is a picture of a mature California Buffalograss installation at a house about 10 miles from me that I took in mid-May. Seeing it convinced me to do my California Buffalograss project…I was very impressed by the fine grass blades.

ucv_gary2

Here’s a pic of a demonstration flat in our greenhouse. California Buffalograss does have thinner blades, offering a softer feel and a more natural native grass look when left unmowed.

Thanks for the pics Gary!

Bermuda is quite the spreader, sending out above ground runners and underground roots. It’s also a tough guy, growing in concrete cracks and otherwise apparently inhabitable locations. While it’s great for some purposes, it can also be quite the nuisance in a garden.

California Buffalograss lawn owner and certified desert landscaper (and did I mention Lazy Gardens blog writer) gave us some advice to pass on to other California Buffalograss wanna-be’s before installing their lawns:

“I strongly recommend that anyone spend the first few warm months killing the Bermuda. If I had one do-over for this lawn, it would be the Bermuda killing… “

Read on to find the most common mistakes people make when trying to kill Bermuda and how to go about eradicating this garden foe!

The most common Bermuda mistakes:

  • Killing Bermuda grass is not difficult, but it’s not going to happen overnight.
  • No matter what the herbicide package says, it will take at least a month and several applications of herbicide to kill 90 to 95% of the Bermuda grass, then several months of spot application on surviving sprigs to get the remainder.
  • The most frequent mistake people make when they try to kill Bermuda grass is to yank out, mow down, or clip off as much visible growth as possible, then use an herbicide “to finish the job”. Herbicides must be absorbed by the leaves to be effective. If you remove most of the leaves before you apply the herbicide, very little of the herbicide will be absorbed. The grass will regrow from the roots.
  • The second most common mistake is to try to kill the Bermuda grass by withholding water, then resorting to herbicides when the grass refuses to die. This is a native of the African savannas, where 6 months without rain is normal. Bermuda can survive herbicides better when it is water-deprived because it absorbs less herbicide when it is dormant from drought.
  • A third mistake is trying to kill Bermuda grass during cool weather. The days and nights must be warm enough that the Bermuda grass is actively growing. Let it “green up”, and don’t start killing the lawn unless you have at least 6 weeks of warm weather left.

How to kill Bermuda (when the grass is green and actively growing, follow these steps):

  1. Water the Bermuda grass thoroughly to encourage it to grow. Herbicides work best when the plants are actively growing.
  2. Wait a week, water the Bermuda grass in the morning.
  3. The following morning, thoroughly spray the Bermuda grass with an herbicide that contains glyphosate. Make sure you follow the package directions for diluting the herbicide. Spray the grass thoroughly, making sure you cover all the leaves.
  4. Wait at least three days to give the herbicide time to be absorbed and spread through the plant tissues.
  5. Now you can yank, clip and mow, because the herbicide has spread into the roots.
  6. Keep watering deeply every few days, as if you were trying to grow the best lawn on the block.
  7. Give the survivors a week or so to grow some leaves, then spray them with the herbicide again.
  8. Repeat the cycle of water, herbicide, water, herbicide until the sprouts stop appearing.
  9. Patrol the area for the next two or three growing seasons and apply herbicide to any new sprouts. The roots of Bermuda grass can be as deep as six feet, and they persist for several years.

Be sure to read her full suggestions here, complete with precautions you should take with any herbicides you are using.

And in case you’re not sure how to spot the bermuda in your California Buffalograss lawn here are some pics from Andy in San Pedro, California who installed his lawn in 2009 and is now having a Bermuda invasion:

Another happy camper! California Buffalograss lawn lover Georia told us, “After years of  dealing with weeds and disease, I love this lawn!…and I’m glad to share my satisfaction with others!”

Beginning of April, installation:

End of May, just mowed:

Beginning of July!

Thanks for sharing Georgia!